This tutorial was meant to teach you how to convert HD .mov trailers to .mp4, so they could be played on Sony’s PlayStation 3. In addition, a guide for converting trailers into iPhone/iPod touch compatible format has been added under the QuickTime Pro section.
There are multiple ways to convert the trailers you download, but I’m going to show you two ways.
Yamb
The first way would to be to download and install Yamb (Make sure to download version 2.0.0.8 w/ installer. Mirror). Yamb is a GUI freeware converter based on the command line tool, MP4Box.
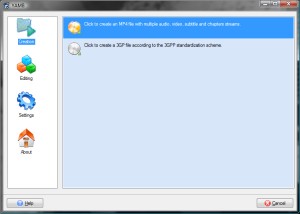
After launching Yamb, the program should open up with the Creation section selected. From there, double-click on Click to create an MP4 file with multiple audio, video, subtitle and chapters streams.
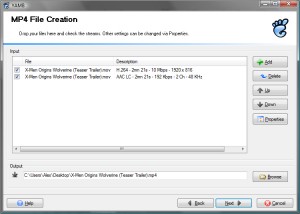
This will bring you to the MP4 File Creation screen. Hit the Add button and open the .mov trailer you have downloaded. Yamb will read the file and list the description for the audio and video codecs of the trailer in the Input box. Select the location where you want to save the file by hitting the Browse button. Before continuing, make sure that both the boxes have checks in them.
Hitting Next will begin the conversion process. This should only take a few seconds, but will vary by your CPU.
Hit the Finish button and select No to exit Yamb; select Yes to begin another conversion.
From here, the .mp4 file can be copied to a USB flash drive or burned to a CD/DVD; from there it can be copied over to the PS3’s HDD.
QuickTime Pro
The second way is to use QuickTime. QuickTime is the video player created by Apple Inc. Although QuickTime is free, to use the exporting feature requires QuickTime Pro, which is $29. If you don’t have QuickTime Pro, please use the first part of the tutorial, which explains how to use a freeware to convert the trailers.
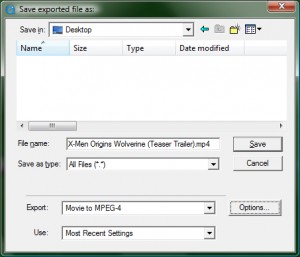
First, you would want to open up the trailer with QuickTime. From there, hit File, then Export… This will bring up the Export window. Enter the File Name you wish to save the trailer as. In the drop-down list under Export select Movie to MPEG-4.
Now hit the Options button, which will bring up the MPEG-4 Export Settings screen.
In the File Format drop-down list, select MP4. In the next drop-down list, select Video. Under Video Format, select Pass Through. All other settings below should gray out after selecting Pass Through.
Hit OK, and then Save to begin the Export process. This should only take a few seconds, but will vary by your CPU.
From here, the .mp4 file can be copied to a USB flash drive or burned to a CD/DVD; from there it can be copied over to the PS3’s HDD.
iPhone/iPod touch
It’s also possible to convert HD trailers for playability on Apple’s iPhone and iPod touch using QuickTime. To do this, simply select Movie to iPhone under the Export drop-down list after navigating to File > Export. The Options button should become grayed out. Hit the Save button and the trailer will convert, creating a M4V file.
From here, transfer the M4V file into iTunes and sync your iPhone/iPod touch. Now you can enjoy trailers on-the-go!
Note: It doesn’t matter if you use the 480p, 720p, or 1080p version of a trailer/clip… the result will be the same (quality, resolution, etc…)
Feedback
Any comments and feedback are welcomed. Please post them here.


video converts but there is no audio. both boxes are checked before converting.
Are you using Yamb or QuickTime Pro?
this is a good tutorial about converting to HD to play playstation 3 or anything. that is mytocents
I got some favourite videos and would like to watch them on my phone everytime eveywhere on the go. But the videos I downloaded are .FLV video format which could not be supported by my phone. I would like to find a video converter to convert FLV to 3GP videos. Do you have the same conversion problem too? Maybe you got lots of video and would like to import them into Windows Movie Maker for editing. But the videos downloaded are .MKV video format which could not be supported by Windows Movie Maker, then you need to convert the MKV to WMV videos first; or you got some AVCHD videos by HD camera, and just wanna upload them to YouTube for sharing, but found that YouTube only support several video formats, this time you may need to convert the AVCHD to FLV files for uploading.
Nowadays, people have so many kinds of portable music/video players, and they play different video formats, so how to convert video from one popular video format to another is a question. Now I will give you a excellent All-in-one video converter: iFunia Video Converter Pro that can do all popular formats conversion in few clicks. The process is relatively simple, so even if you are not technically savvy, you should be able to convert all popular video formats to MP4, AVI, FLV, 3GP, WMV, MOV…on MAC without an issue. Well, read on.
Step1. Download and install iFunia Video Converter Pro
Download the All-in-one video converter from iFunia homepage or download sites, and install it on MAC.
Step2. Add video files to the converting program
Run the program iFunia Video Converter Pro on your Mac and click the button “Add..” to add video files, you may add as many videos as you want for batch conversion.
Step3. (Optional) Edit videos: crop, trim, add effects, add watermark
This step is optional step. But when you come to review the video your taken and find it’s too dark or the focus is blurred, you may wanna fix these flaws and apply artistic effects with the Edit Video module of the program. Plus, with just a few clicks, you can crop the video to remove black sides, trim the video and add text or image watermark easily as below.
Step4. Set the output formats and other settings
From the “Convert to” drop-down list select output format for each video file and specify a directory on your computer to save the output files. Remember that the output file size mostly depends on the Bitrate you set. Larger Bitrate, larger file size. Actually video with bitrate as 768 is acceptable for watching.
Step5. Start the converting
After all the preset done, you may click the big button “Start” to begin converting videos to MP4, AVI, FLV, 3GP, WMV, MOV that which one you need. The convert progress bar shows you how much of the encoding is completed. The encoding time will depend on several variables including: the duration of the video file, the speed of your computer, what other activity your computer is currently doing and the bitrate you set.
Tips
* You can preview the video by selecting the video and clicking Play in the preview pane. You can also take snapshot and save them as jpg, bmp file while preview.
* Supports Mac OS X 10.5 Leopard and Mac OS X 10.6 Snow Leopard on iMac, Mac Pro, MacBook, MacBook Pro, MacBook Air, etc.
* If you are a PC user, please just refer to iFunia Video Converter Pro for Windows.
You don’t need QT Pro. You can do it with iMovie HD.
http://www.joelgerard.com/2010/11/14/convert-mov-to-mp4-with-mac-imovie-hd/
maybe you can use this video converter: http://www.aimersoft.com/convert-mp4/convert-mp4-to-mov-on-mac.html
To convert MOV to MP4 without losing quality, i highly recommend iDealshare VidoeGo which can convert MOV to MP4 or convert MP4 to MOV with no quality loss.
It also can convert MOV to Apple ProRes, DV, AVI, WMV, FLV, MKV, MPG, WTV etc video format.